MARK BANDO'S WEBSITE
WAR STORIES First BloodCircumstances of landing at night in enemy held territory sometimes forced paratroopers to kill or be killed upon landing. Those who were not prepared
did not survive. The late Pvt Doug Garrett of B/502, wrote about his first combat in Normandy: "Finding out in jig time that war was kill or be killed, it took me less than five minutes to find that out. A bullet had hit my reserve chute and felt like being hit in the stomach with a sledge hammer. I then hit the ground and pulled a .45 cal. pistol given to me by my supply sgt cousin in the Air Corps.
First BloodCircumstances of landing at night in enemy held territory sometimes forced paratroopers to kill or be killed upon landing. Those who were not prepared
did not survive. The late Pvt Doug Garrett of B/502, wrote about his first combat in Normandy: "Finding out in jig time that war was kill or be killed, it took me less than five minutes to find that out. A bullet had hit my reserve chute and felt like being hit in the stomach with a sledge hammer. I then hit the ground and pulled a .45 cal. pistol given to me by my supply sgt cousin in the Air Corps.
While I lay there, gasping, a German came out of the bushes in a dive for my throat with a razor sharp knife. It was his last dive at anybody. That .45 roared like a cannon and he was dead when he landed on top of me. I cussed him out for getting his blood on me, but then thought 'better his than mine'. I then waded into a flooded area and washed his blood off.
Then I saw 3 gliders come in, with machineguns and artillery following them to the ground. Then mortars took over. Then, I started up a road and a machinegun opened fire at me and I learned how to do the jitterbug faster than any man had ever learned it before or since. How it missed me, I'll never know. I'm just glad it did.
I only spent five days in Normandy before being seriously wounded, but it was five days of my life that I can never forget."
FREQUENTLY ASKED QUESTIONS
"What was the size and organization of a rifle company in a WW2 Parachute Infantry Regiment (PIR)?"
A typical PIR rifle company at the time of Normandy, had 130 EM and 8 Officers. The Company HQ group was not a platoon, not even a squad. It consisted of ten men and was more of a Co. HQ 'Section'. Each rifle platoon had 40 men. Three rifle squads of 12 men each and a 4 man mortar squad (60mm mortar).
"Who carried which weapons and why didn't all paratroopers carry the folding stock carbines, which were especially designed for them?"
Most members of a rifle squad were armed with 30-06 caliber M-1 Garand rifles, which were a much more potent weapon than the carbine, which lacked range and knockdown power. The M1-A1 carbine with a folding stock, was issued to officers, also to some members of crew-served weapons (i.e. 60mm mortar squad), while non coms(sergeants) carried the M1-A1 or M1928A1 Thompson submachine-gun. This included Staff Sgts (platoon Sgts) and 3 stripe Buck Sgts (squad leaders). These weapons were prescribed by the TO&E (Table of Organization & Equipment), but individuals frequently opted for-and usually got, whatever they wanted. This switching was done on the battlefield, if not accomplished prior to a mission. Since the M-1 Garand was the best all-around weapon, many officers also used it, instead of the carbine, and some noncoms swapped their TSMG for an M-1. Some members of crew-served weapons also preferred the M-1 over the carbine, despite it's extra weight, when they were also carrying such items as MG ammo, tripods, baseplates, mortar tubes, 40lb A-4 machineguns, etc. If all the paratroopers had been equipped with carbines instead of M-1 rifles, it would have been a lot more difficult for the 101st Airborne to win any battles.
Each rifle squad contained a LMG crew, (instead of the B.A.R. found in regular infantry companies) and the PIR squad tactics were built around the LMG laying a base of fire.
The officer breakdown was as follows: Company Commander was a 1st Lt or Captain, with a 1st Lt. as company XO(Executive Officer, meaning 2d in command). Each platoon had two Lts, (a 1st Lt plt leader and a 2d Lt asst. platoon ldr). Each platoon also had 1 staff sgt, who was the platoon sgt (in a regular infantry platoon, this job was performed by a Tech Sgt), and four buck sgts, who served as the squad leaders. Each squad also had a corporal, who served as assistant squad leader.
Each battalion had 1 Headquarters company and 3 rifle companies. The Bn HQ Co. was a bit larger, numerically, than a rifle company (closer to 150 personnel) and had a 81mm mortar platoon, a LMG platoon and a communications platoon, also a bn. Mess Section.
HQ Co. 1st Bn supported A,B, and C companies.
HQ Co 2d Bn supported D,E, and F companies.
HQ Co 3rd Bn supported G, H, and I companies.
note: The Browning Automatic Rifle (B.A.R.) was not issued to WW2 paratroopers because it was considered too awkward to jump with. It was not listed on the TO&E for Parachute Infantry rifle companies. The weapon weighs about 20 lb and is four feet long and cannot be broken down for jumping purposes. This is why squad tactics centered around the LMG (dropped in bundles) instead. The B.A.R. was an effective and devastating weapon and immediately after WW2, the 82nd and 11th Airborne Divisions incorporated them into their TO&Es and devised a method of jumping with them fully-assembled, and strapped alongside the parachutist's leg, muzzle down.
PLEASE STOP ASKING ABOUT B.A.R.s ON THE FORUM
"Did company size and organization stay the same, once they entered combat"?
This depends on how scattered that particular company was, on a combat jump.
Each Parachute Infantry Regiment started with approximately 2,200 men.
Normandy was the worst for unit dispersion and a LOT of improvising had to be done by small pickup units, which bore no resemblance to their original organization. This was when the intiative of a lot of self-motivated paratroopers who expected the unexpected, paid off.
I suggest that anyone interested in these organizational questions get a copy of my 4th book, '101st Airborne-The Screaming Eagles at Normandy'. Organizational stuff is explained in there as well as abbreviations used in these units. See the Books page of Trigger Time, for ordering info.
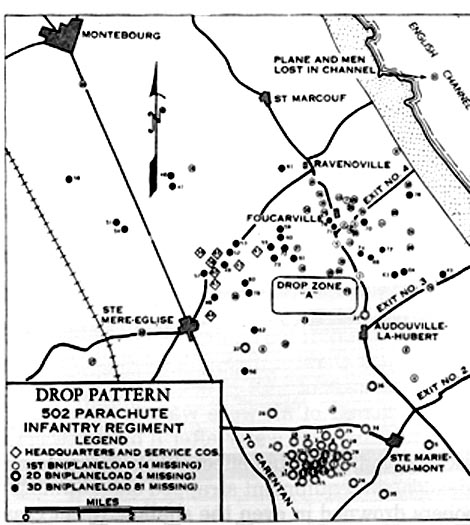 The map above appears in 'Rendezvous With Destiny', Infantry Journal Press, 1948.
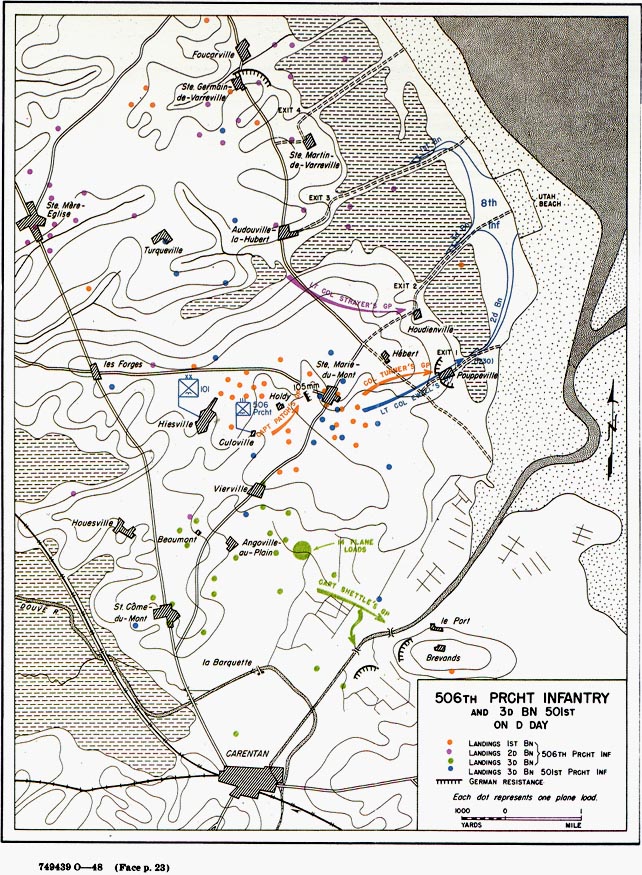
Landings of the 506th PIR in Normandy
 The map depicted above is part of the U.S. Government series published in the history "Utah Beach to Cherbourg". Although the stick distributions are subject to debate and
usually are debated, especially by the Air Corps, these "actual" landing locations were determined by having survivors place a pin on the map, closest to where they thought they landed. It is interesting to see that 12 or 13 planeloads of Strayer's 2nd Bn landed in the vicinity of St Mere Eglise. This was a significant percentage of his battalion, and this resulted from pilots turning on the green light too early. LTC Strayer and his command group landed in the area between Ravenoville and St Germain de Varreville with approximately half his battalion personnel.
The map depicted above is part of the U.S. Government series published in the history "Utah Beach to Cherbourg". Although the stick distributions are subject to debate and
usually are debated, especially by the Air Corps, these "actual" landing locations were determined by having survivors place a pin on the map, closest to where they thought they landed. It is interesting to see that 12 or 13 planeloads of Strayer's 2nd Bn landed in the vicinity of St Mere Eglise. This was a significant percentage of his battalion, and this resulted from pilots turning on the green light too early. LTC Strayer and his command group landed in the area between Ravenoville and St Germain de Varreville with approximately half his battalion personnel.
Although Captain Shettle, who assumed command of 3rd battalion, always believed that he landed below Angoville au Plein, testimony from 501 Pathfinder Bob Sechrist suggests that Shettle actually landed just below St Come du Mont. Perhaps this will never be proven, but Sechrist joined Shettle's growing group barely south of that town, soon after the 3/506th serial landed, and followed him to the strongpoint across from Brevands. In the fighting near there, Sechrist was taken prisoner 2 days later.
Sgt Ed Shames, who jumped with a HQ/3 506th stick, says he landed in a condensed milk factory at the edge of Carentan. There is a green dot at the north edge of that city but that is believed to have been the H/506th stick of 1st Sgt Gordon Bolles, which also contained my friends Fred Bahlau and the late Gordon Yates.
One member of that stick landed very close to the church in Carentan.
So it is in some cases difficult to reconcile the dots with testimony from individuals as to what they saw when they landed. Rather than being resolved, additonal testimony just seems to make these issues MORE confusing...and so it goes.
F/506th in the D-day battle at Brecourt
Len Hicks was one of the older members of F/506th and he wrote his war memoirs before he died. Thanks to Bill True, also of F Co., we have excerpts of what Len had to say about the famous fight at the 105mm gun battery. This reminds us that elements of other 2d Bn companies were also involved in the
fight to take out those guns. Len wrote:
"We passed through the edge of one or maybe two small towns. Very little fire until we had passed the 2d or 3rd, right beside some barn-like buildings and a high hedge. The krauts really showed what an '88' could do. Some of the (2nd) Bn officers did some scouting of this situation, because this emplacement was not on aerial photos and neither was it on the sand table.
Capt. Winters told me to take a detail down and clear it out, so we could go on to our objective. There were more E Co. troopers in this group, about 12 to 14. They were right by me when Capt. Winters was briefing them.-I told Capt. Winters I would like to have some of that action. His reply "Would anyone else like to go?"
I walked over and asked for volunteers. Sgt Julian Houck was the only one interested.
(During the battle) We were laying very near each other, when he suggested he would throw a grenade over to #4 emplacement. I told him to be very careful-we did not have much cover, in case they wanted to throw some back.
I'm sorry to say that "Rusty" was killed instantly by a burst of burp gun fire. He was hit across the top part of the shoulders, all internal bleeding-the little amount of external blood could have been wiped-off with a cigarette paper. He did not suffer. I can say Thank God, for "Rusty" was one of the good ones. I do not know if it was Rusty's grenade or my shot that got that guy. About 2-3 minutes later, Lt. Compton crawled up to check on us. After a few minutes, he suggested
that I try to work my way over toward this 4th gun. The only way I could see was the trench between the two guns. For the first few feet, I could walk bent-over then the trench became too shallow. I had just started to get down, when I was hit in the right shin bone. I stopped. Lt. Compton asked "What's wrong?" "I think I slowed one down a little" was my reply. Luckily, I could walk back to a spot near him.
He brought out his jump knife (very sharp)-ripped my pants leg up to near the crotch, and proceeded to be the best aid man who ever worked on me-later I did have others. He used all my bandages and some of his-most of my calf muscles were blown away and I had started to bleed. He wanted me to lay down there, but I told him I only had two rounds left and would not be much help.
When I crawled past Capt. Winters he asked about how serious it was, and could I get out, because we were all out of ammo. By the time I crawled to the end of this trench, everyone had passed me. The trench here was about 4' deep, and no matter how I tried, I just could not make it. I sat back against the wall and waited for whatever came around the corner. It would be rough. I was damn good snap shooting with a rifle. I heard someone running and figured this it it. I have thanked God many times, because I am not an excited person. It was "Red" Kimberling from HQ Co.2nd Bn. He had been up in front of me. No one knew this and had not notified him to pull back. He had run out of ammo. He helped me out of the trench and then carried me back to a fence and rolled me under. Here was another trooper giving us some cover fire. There was an open field to cross-they figured to use my arms to tow me and let my butt absorb the shock. These guys may never have won any medals for running, but they were going so fast that my butt never touched the ground until we stopped. They were not even winded!
I think the final count on the number of krauts that made up the crews for these guns was 52-53. I think there were 15 of us. When the tanks came, they went down to these emplacements for a check up. We had done a pretty good job.
MACHINEGUN POINTERS FOR COMBAT-by Melton"Tex"McMorries, G/501 PIR
To be an expert machinegunner, as any combat gunner will tell you, requires far more than being able to align the sights, traverse, elevate and the many more basic principles taught in the training schools and on machinegun ranges. (However) All this training is essential and should be carried out every time the situation could possibly demand.
In fact, to fail to master the art of machinegunning in every prescribed phase of training, could cause an otherwise good gunner to let his entire combat unit down.
For instance, the gunner's ability to lay on an auxilliary aiming point with accuracy, possibly might never arise. It could be important frequently, or it might possibly be required in a decisive showdown only once. But it, like all other principles, should be mastered, and in combat, it should constantly be remembered. Therefore, a mental analysis of the terrain must be made from every position, the range, the outstanding features of the terrain, blind spots, etc. Because, if a hidden machinegun suddenly opens up, there may be no time for this. Just a fraction of a second can mean the difference between life and death.
When engaged with a modern and well trained enemy, the (expression) 'mow them down', is mostly talk. If the enemy presents this type of target, most any machinegunner can pull the trigger and align the sights. But a well trained enemy knows the rate of traverse of a machinegun, and the attack is paced accordingly. Mostly, the gunner will have one clear target only at a time, and that for only a few seconds. He may see many, but because of the wide traverse required to fire on the target, for all practical purposes, they are not there.
When the gunner has to traverse five or six mills, this cuts his time to practically zero. For this reason, we readily see that the necessity for traverse should be cut to the minimum. The degree of effective firepower will correspond to the number of good targets that can be brought into the 2 and 3 mill traverse. I am not going to describe 'firing an area', as this procedure is pretty well established, and should be carried-out as often as the occasion demands. Of course on the attack, it is more frequently used, when there are no priority targets.
The fastest way to decrease the necessary traverse of a machinegun in correspondence to good targets, is the angle of fire. A gun pointed straight into a attacking line has the greatest disadvantage, because of the traverse required to bring it onto various targets. And for another very important reason, it increases the number of times the traverse will be made to catch a target. This is considerable and sometimes fatal. Naturally, the position of the defense line will do much to increase the efficient firepower of a machinegun, and if the enemy's attack is coming from an angle, in relation to the position of the gun, the degree of traverse is automatically lessened. THEN, the gunner, by using all the angle the range will permit, can fire directly at a clear target almost continuously. For this reason, as well as safety of defensive gun position, it should be chosen with care. Where time permits, 2 or 3 positions should be prepared for each gun. Remember, a machinegunner is a priority target in ground operations.
Perhaps the second best way to decrease the traverse is in selecting field of fire, assuming this does not conflict with the small defense set up of the unit. This is so lengthy a subject, I will only point to one or two examples. This again will depend to some extent on the first mentioned, because to have a good field of fire, you must have targets. In forest, this can be small lanes through the trees, at an angle. Other guns should be coordinated so that no section of the enemy line can sweep forward without being challenged with machinegun fire.
There is one thing a machinegunner cannot do and (still)use the full efficiency of his firepower in a large scale attack: that is protect himself. The closer the attacking force gets to the defense line, the more efficient the firepower of the machinegun becomes, and the less he is protecting himself. (This is) because the angle of fire is more parallel, more enfilade, and the gun is moving toward the final protective position. If all the defensive machineguns have followed the attack in, that other few inches that you have to push the traversing mechanism over to lock on the final protective line will never be used. But the enemy will be pouring into foxholes around the machinegunner's area that kept firing straight ahead.
Why was it, that identically trained units, units containing the same T.O.'s, varied so much in combat effectiveness? Morale? Training? Bravery? Perhaps all of these, to a small degree, but when it comes to the showdown, it is the unit that combines all this and gets the maximum, efficient use of its firepower. A unit can have many anti tank weapons figured into its overall strength, but these weapons are of little use, if they are not in the proper place, at the proper time.
The same is true of all weapons. Therefore, a machinegunner that has arranged to place his gun in the correct position...
that has figured-out the proper angle of fire to obtain the most targets that a given type of action permits...
a machinegunner that has estimated the range...
that can slap his gun in a second, to fire on the enemy's new phase line...these things and many more, are the final key.
To estimate, to anticipate, and to be prepared.
Machineguners, if you want to give your unit the maximum benefit of your gun, use what time you have between attacks, pauses in actions, to figure ahead. Remember, the machinegunner's life, as well as his unit's, can't wait to learn the little things the hard way.
The subject of combat machinegunning is so lengthy, that only a few points have been discussed. In many cases, offense and defense are similar, with small variations.
Melton McMorries ex-501st Parachute Infantry
101st Airborne Division
Confusion Over Actions at Dead Man's Corner
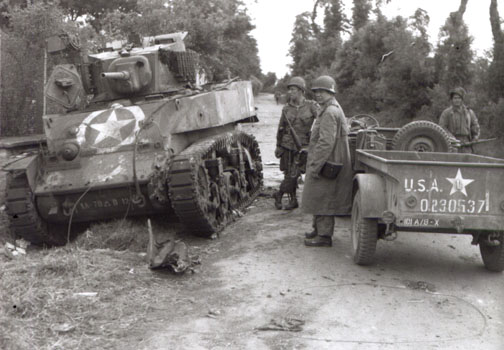 The sharply angled V intersection of the D-913 with the old N-13 highway, several Km north of Carentan has long been a significant historical landmark in the battle of Normandy. The large house that stands in the point of the V, is now a museum, housing artifacts owned by Belgian historian Michel Detrez. The intersection originally got it's name from the fact that on 7 June, 1944, a American light tank (M-5) of Company 'D', 70th Tank Battalion, was knocked-out nearly in front of the large house and sat there for days afterward. The burned body of the tank commander could still be seen in the turret, and soldiers started to use it as a reference point, saying, "go to the corner where the dead man is in the tank".
This was soon shortened to 'Dead Man's Corner'.
Lt. John Reeder of RHQ/506th took the photo above, looking northeast up the D-913 road, which runs to St Marie du Mont; this road has since been widened and paved. You can see a small hole in the left side of the tank, resulting from the German round that knocked it out.
Some confusion has arisen over exactly how that tank ended-up there, mainly due to the writing of A/506th trooper Donald R. Burgett in his first book, 'Currahee'. Visitors to the area, who have attempted to reconstruct the action, have found difficulties in reconciling Don's account to the physical evidence. I'll attempt to explain why:
I can tell you that I've visited the spot twice with Don, in 1998 and in May, 2005. The hedgerow below DMC, from which Don and other Able Co. men engaged hundreds of retreating Germans, was situated near the east shoulder of the old N-13 road, several hundred yards south of Dead Man's Corner.
The hedgerow has been REMOVED-it simply isn't there any more.
This WAS the hedge that Don B. slid down with Hagenbuch, to fire the LMG at Germans running west across the road to the right (n) of them, then later engaging Germans who circled around to a point directly across the road from them. As you know, Don left that position after the LMG was damaged by bullets and Hagenbuch was KIA.
Trotter was running up and down the same hedgerow chucking hand grenades clear across the road, to the west side of the N-13.
As to the tank, a couple of details in physical evidence have since caused Don to re-think his perception of what happened. First, Don thought the tank was hit by an AT gun, like an 88mm or 75mm when it reached the corner. Since the tank Don was talking to, was headed in the opposite direction of the final rest position of the tank we see in photos, that would've required Don's tank to make a half-circle in direction, after being hit (not impossible but unlikely). It also would've required the AT round to be fired from the north or northwest.
After seeing Lt. John Reeder's excellent photo of the KO'd tank, we have no doubt that a Panzerfaust, not an 88mm, made the small hole in it's side. We have evolved a new theory that the tank Don talked-to, continued northeast up the D-913 and escaped to get more ammo. At almost the same time, the tank which was later knocked out, passed it going south, then was KO'd by a panzerfaust round, fired from the south edge of the small road that runs toward le Bel Enault and Bse Addeville.
If you've conducted an on site investigation of that area, you know there is a steep gully there, with bushes around it, and a Panzerfaust gunner could've worked his way into that position while Don and friends were fighting to the south of him, or he even could have been in position there, all along, as Don's group circled around him earlier. It was a likely and ideal spot to bushwhack a tank and his job in being there was to wait for an opportunity to do just that.
In the only 2 known photos showing the KO'd M-5 tank in front of the house at DMC,the question has been raised, of why we can't see the dead commander's burned body in the turret?
A trooper I interviewed in late 2006 (Emmert O. Parmley of F/502), stated that he examined that tank briefly, while marching past the area, before starting down the causeway. He claims it was not the commander, but the Driver, sitting in the left front area of that tank, who was still seated inside, dead. He also says that you could not see this body unless you walked-up close to the tank and peered into the driver's compartment through his open hatch, and from a certain angle. Parmley also saw the body of a paratrooper south of there, near the top of the causeway, lying dead with the top of his skull peeled back. This was evidently James Hagenbuch of A/506th, who was KIA right beside Don Burgett on 7 June, 1944, whose death is described in Don's first book 'Currahee'.
Parmley also saw 502nd medical Captain Doug Davidson walk south on the Causeway-starting from Dead Man's Corner on 11 June, 1944, accompanied by 2 enlisted medics and waving a white flag. This started the truce to collect wounded from the battlefield, south of bridge four. Parmley followed Davidson's trip down there and says the Germans fired bullets at the ground on either side of the road as the medics approached but did not shoot at them and eventually allowed them to enter their lines.
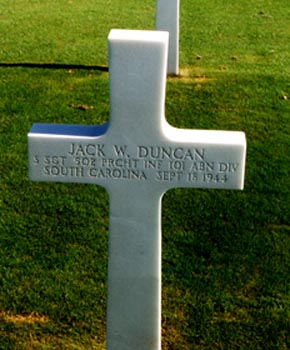
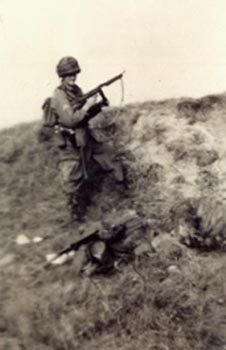 1st Sgt Jack W. Duncan from S.C. was the youngest 1st Sgt in the 502 and was known for his hair-trigger temper. Before D-Day, Duncan had been in a number of brawls in England, when he perceived that other soldiers had crossed him. Before Normandy, Duncan was demoted to S/Sgt and transfered from HQ Co. 2nd Bn. to E/502. On 18 September, 1944, D/502 was embroiled in a battle at a (possibly rail)embankment east of Best, Holland. Ray Hood calls it "hand grenade city", as both sides were lobbing grenades over the embankment and shooting, when targets presented themselves.
The ground was sandy and heavy fighting raged. The 101st troops had run out of water and were extremely thirsty. Walt Kawalek of D/502 later wrote:"Our rifles got sand in the breeches, and we were forced to work the bolts by hand until we could get enough oil on them to properly function. Seemed like the hotter they got, the better they worked. Linseed oil boiled out of the stocks and burnt our hands from the terrific heat of the barrels." Into the battle came S/Sgt Duncan. He rushed over from his company's position several hundred yards away, to take part in the fighting. He did not receive permission to do this, but was always eager to join the action. Somehow, Duncan captured a German officer. As the story goes, he put a .45 government model pistol to the officer's head and marched him up onto the embankment. As the two men became visible, firing from both sides tapered off. Sgt Duncan instructed the German to shout orders to his troops to lay down their weapons and surrender. The German officer shouted something to his men-none of the Americans understood what. As if in reaction, all the German troops opened fire simultaneously, killing both Duncan and the enemy officer. The battle resumed and British armor eventually arrived, which turned the tide of battle. Some Germans withdrew, many more were captured. In the photo above, taken by Lt.Paul Dovholuk of D/502, an unknown paratrooper stands on the embankment after the battle. Below: a 1999 photo of S/Sgt Jack W. Duncan's grave at Margraten, Holland.